This week is an interesting week considering that there is FREE toothpaste involved! Who doesn't love free??? In my scenario, if all goes as planned, each item comes to just 47 cents apiece. I am super excited about that, too. I hope this might help you develop your ideas for your scenarios or inspire you to at least get some free toothpaste!
Transaction #1
Buy 2 Degree deoderant for women @ 2/$7= $7
Use 2 $1/1 coupons RP 1/29 - $2
Buy 2 Degree Adrenaline for men @ 2/$7
Use 2 $1/1 Coupon RP 1/29= -$2
Buy 1pkg Lever soap 2bars= $2.79
----------------------------------------------------------------------
$12.79
Use 4ECBs from last week -4
-------------
$8.79 oop
Get back 5ECBs
Transaction #2
Buy 2 Speed Stick Deoderant @1.99= $3.98
Use BOGO coupon RP1/29 -$1.99
Buy 2 Colgate total @2.75= $5.50
Use $1/1 (Reinventing Beauty mag) -$1
Use .75/1 RP 1/29 -.75
Buy Irish Spring Bar soap 2pk $3.00
Use .50/1 RP 1/29 -.50
-------------------------------------------------------------
$8.24
Use 5 ECB from #1 -$5.00
---------------------
$3.24 oop
Get back 4ECB
PLUS send in $5 Rebate form for this transaction
Transaction #3
Buy One Touch Ultra Mini Glucose Meter= $9.99
Use $10/1 coupon -$10.00
Buy 4 Nivea Lip products @2.50= $10.00
Use 2 $3/2 RP 2/12 -6.00
------------------------------------------------------------------
$4.00
Use 4ECB from #2 -4.00
-----------------
Get 3 ECB for next week $0 oop
Total Product value $49.27
Total Out of Pocket $12.03
REBATE of $5
Total Cost of transactions after rebate $7.03! Which is 47 Cents per item. Yay!!
Sunday, February 12, 2012


Tuesday, February 7, 2012
A Goal Without a Plan....
There is a saying that a goal without a plan is just a dream. I am not personally a fan of bumper-sticker type advice but, there is something about that one that just makes so much sense that I have to forgive it for seeming a little trite. This year, I have decided to take it to heart.
I have already written about my joint goals with Husband for our home and family and finances. But, I have a separate list for personal goals. I hope that by listing them here, it might inspire you to make your own list! I would love to see what you come up with and we can share them during my goals monthly checkup which I will do on this blog as well.
Again, as with my family list, I chose priorities and then focus areas under each one.
Home
- Keep home company ready
-Complete Master Bedroom Decor
-Use coupons combined with sales to save $1200 on groceries/household and transfer to savings acct
-Try the CVS $50 Gift Card Challenge (which can be found here: Simply CVS )
-Complete 12 DIY Projects (Which will be listed in another post)
Mothering
-Read 150 different new books to the boys
-Create 100 craft projects/busy bags/cooking projects
Fitness
-Walk/Run/Jog 500 miles in 2012
-Complete a 5k in under 45 minutes
-Recondition post baby-post hernia surgery abs
Self Care
-Read devotional bible daily
-Read at least 12 books for pleasure (Also will be listed in another post- along with reviews!)
-Arrange one Mom's Night Out per month
What kinds of things are you working on for the year? Do you have a link to a list you find inspiring? Have you blogged about this, too? Link to it here in the comments. I would love to see what others are doing!
I have already written about my joint goals with Husband for our home and family and finances. But, I have a separate list for personal goals. I hope that by listing them here, it might inspire you to make your own list! I would love to see what you come up with and we can share them during my goals monthly checkup which I will do on this blog as well.
Again, as with my family list, I chose priorities and then focus areas under each one.
Home
- Keep home company ready
-Complete Master Bedroom Decor
-Use coupons combined with sales to save $1200 on groceries/household and transfer to savings acct
-Try the CVS $50 Gift Card Challenge (which can be found here: Simply CVS )
-Complete 12 DIY Projects (Which will be listed in another post)
Mothering
-Read 150 different new books to the boys
-Create 100 craft projects/busy bags/cooking projects
Fitness
-Walk/Run/Jog 500 miles in 2012
-Complete a 5k in under 45 minutes
-Recondition post baby-post hernia surgery abs
Self Care
-Read devotional bible daily
-Read at least 12 books for pleasure (Also will be listed in another post- along with reviews!)
-Arrange one Mom's Night Out per month
What kinds of things are you working on for the year? Do you have a link to a list you find inspiring? Have you blogged about this, too? Link to it here in the comments. I would love to see what others are doing!
Sunday, February 5, 2012
New Traditions- A Valentine Tree
Ours is a relatively young family. Well, OK, that isn't really true. Husband and I aren't all that young anymore and we have been married over 10 years. But, our children aren't even 3 years old yet so, we have a lot of family traditions to build.
One of them got their start about 14 years ago- a year after I first became a Christian. I moved back home from college to live with my Mother after my father's passing and I finished school locally. My sister got me this little fiber optic table top Christmas tree that I LOVE. It is multicolored and shimmery and awesome. I wasn't allowed by my mother to have a regular Christmas tree in the common area so, this little tree was the perfect one to keep in my room.
Each Christmas since then, I have happily displayed this tree even though I have long since had my own home with its own large tree.
Christmas of 2010, I put up my tree and turned it on. The boys were enthralled by the sparkle and multicoloredness of it and asked for me to plug it in time and time again even long after Christmas was over. I just couldn't bring myself to pack it up with the rest of the Christmas decor because they got so much joy out of my little tree. So, it stayed out.
This past year for Christmas, I put some snowflake decorations on it and the boys loved that. But, once I had put away the Christmas stuff, I was struck by an idea to have a multi season perpetual holiday tree. So, our tree is now decorated for Valentines day for the first time and I'm guessing that, through the year, it will acquire its own little wardrobe of different holiday attire.
It was incredibly gratifying to hear their screams of delight when they saw it decked out in hearts and declared the decorations pretty. I just have to either bottle that feeling..... or keep decorating it for new holidays!
Here it is in its Valentine glory!

One of them got their start about 14 years ago- a year after I first became a Christian. I moved back home from college to live with my Mother after my father's passing and I finished school locally. My sister got me this little fiber optic table top Christmas tree that I LOVE. It is multicolored and shimmery and awesome. I wasn't allowed by my mother to have a regular Christmas tree in the common area so, this little tree was the perfect one to keep in my room.
Each Christmas since then, I have happily displayed this tree even though I have long since had my own home with its own large tree.
Christmas of 2010, I put up my tree and turned it on. The boys were enthralled by the sparkle and multicoloredness of it and asked for me to plug it in time and time again even long after Christmas was over. I just couldn't bring myself to pack it up with the rest of the Christmas decor because they got so much joy out of my little tree. So, it stayed out.
This past year for Christmas, I put some snowflake decorations on it and the boys loved that. But, once I had put away the Christmas stuff, I was struck by an idea to have a multi season perpetual holiday tree. So, our tree is now decorated for Valentines day for the first time and I'm guessing that, through the year, it will acquire its own little wardrobe of different holiday attire.
It was incredibly gratifying to hear their screams of delight when they saw it decked out in hearts and declared the decorations pretty. I just have to either bottle that feeling..... or keep decorating it for new holidays!
Here it is in its Valentine glory!

Saturday, February 4, 2012
Freebies of The Week and How You Can Find Some, Too!
I love freebies! I have been making more of an effort to register for ones that I want for myself out ones that I think my family would love.
In my mailbox this week was a package of a dozen milk chocolate hot cocoa k-cupswhich I think retail for about 7 dollars! I think that has been my highest value freebie yet.
Also, I received a 6 dollar credit to drugstore.com for a previous purchase (they credit you with a percentage of each purchase that you can use like a gift card later) and I got some concealer and highlighter I was needing-for free!
I used my Shoprunner membership to get free 2 day shipping on my drugstore.com order so it was truly a zero balance!
I have signed up for many more freebies that I am super excited to get. I will update with my latest finds from my mailbox!
One great way that you can try right now to get a few freebies is to check out icravefreebies for the latest opportunies to sign up for some great free things. One thing I will also suggest is to sign up for a free email account (like gmail or hotmail) to use for your freebie adventures. That way, you won't get a spam cluttered inbox in your regular email!
Try out new products, bless your family with products they would love, or take some items off your "to buy" list for free!
Also, I received a 6 dollar credit to drugstore.com for a previous purchase (they credit you with a percentage of each purchase that you can use like a gift card later) and I got some concealer and highlighter I was needing-for free!
I used my Shoprunner membership to get free 2 day shipping on my drugstore.com order so it was truly a zero balance!
I have signed up for many more freebies that I am super excited to get. I will update with my latest finds from my mailbox!
One great way that you can try right now to get a few freebies is to check out icravefreebies for the latest opportunies to sign up for some great free things. One thing I will also suggest is to sign up for a free email account (like gmail or hotmail) to use for your freebie adventures. That way, you won't get a spam cluttered inbox in your regular email!
Try out new products, bless your family with products they would love, or take some items off your "to buy" list for free!
Tuesday, January 31, 2012
Years Worth of Soft, Fresh Laundry for about 10 Bucks!
Want to know the secret about why I won't need to buy fabric softener until my toddlers start middle school (or thereabouts!)? I read, some years ago, in a magazine or online or on a blog or somewhere about how to save money on laundry. There were a lot of suggestions on how to save a few pennies here and there. Not really being the type to make my own detergent (though, I might try it at some point) I thought about what my next biggest laundry cost is- my fabric softener habit.
Now, yes, I read that throwing a cup of vinegar in the wash would soften without the need for an extra product in the dryer. Or, that line drying was the freshest scent in the world. But, truly, I just want some Snuggle softness and freshness. I just can't make do without that darn little bear.
Floating around in my head since I read that story a few years ago was the idea of using liquid softener to make my own dryer sheets. It seemed easy enough but, as I have often found, I was afraid that it was deceptively easy in the story....and maybe not so much when I actually tried it.
Me being me, I just decided to go all in and I bought a huge warehouse sized jug of liquid softener. I really had no idea what I would do with it all if this experiment didn't work. I assume that I could have waited until I learned to CVS shop well enough to get some free softener but, I'm not really the patient type once I set my mind to something.
For the sheet part of the equation, I used an old receiving blanket from the boys' baby days. I cut it into squares about the size of a regular fabric softener sheet. Then, I used a food storage container (which will never be used for food again!) and put some of the liquid softener in. I stuffed the fabric squares inside, put the lid on, and shook it up to cover all the fabric. I let it sit in the softener about an hour.
Then, I took them out, squeezed the excess off them (into the container for future use) and hung them using a pants clamp-type hanger until they dried. I was amazed how little softener was gone from the container. These sheets can be used for 7-10 loads before they need to be refreshed with softener so, I figured there would be more softener used up by the process of making essentially a month's worth of dryer sheets.
It was then that I realized that I had a huge mountain of softener left over for future loads if this actually worked!
So, I washed my first load, put it in the dryer, and threw one dry sheet of liquid softener soaked baby blanket (doesn't THAT sound promising??). Anyway, when I took out the laundry, it was static free, soft and smelled so fresh that I couldn't stop sniffing it while I was folding.
The softener sheet came out and still had plenty of softener left on it so, I hung it back up for the next load. I have been using them for two weeks and each load is just as soft and fresh as the first. And, I still have 2 sheets that I made that I haven't even touched. The used up ones are back in the softener container ready to be dried again and reused.
I am super excited about this because I spent just under $10 for the softener and it looks like it is going to last, literally, YEARS. I won't have to buy softener until my boys are old enough to throw in their clothes themselves!
This was definitely an experiment worth doing. Even Husband remarks on how great the laundry feels and smells and that this money saving method isn't even hard or inconvenient to use.
Give it a try and let me know how it goes!
Now, yes, I read that throwing a cup of vinegar in the wash would soften without the need for an extra product in the dryer. Or, that line drying was the freshest scent in the world. But, truly, I just want some Snuggle softness and freshness. I just can't make do without that darn little bear.
Floating around in my head since I read that story a few years ago was the idea of using liquid softener to make my own dryer sheets. It seemed easy enough but, as I have often found, I was afraid that it was deceptively easy in the story....and maybe not so much when I actually tried it.
Me being me, I just decided to go all in and I bought a huge warehouse sized jug of liquid softener. I really had no idea what I would do with it all if this experiment didn't work. I assume that I could have waited until I learned to CVS shop well enough to get some free softener but, I'm not really the patient type once I set my mind to something.
For the sheet part of the equation, I used an old receiving blanket from the boys' baby days. I cut it into squares about the size of a regular fabric softener sheet. Then, I used a food storage container (which will never be used for food again!) and put some of the liquid softener in. I stuffed the fabric squares inside, put the lid on, and shook it up to cover all the fabric. I let it sit in the softener about an hour.
Then, I took them out, squeezed the excess off them (into the container for future use) and hung them using a pants clamp-type hanger until they dried. I was amazed how little softener was gone from the container. These sheets can be used for 7-10 loads before they need to be refreshed with softener so, I figured there would be more softener used up by the process of making essentially a month's worth of dryer sheets.
It was then that I realized that I had a huge mountain of softener left over for future loads if this actually worked!
So, I washed my first load, put it in the dryer, and threw one dry sheet of liquid softener soaked baby blanket (doesn't THAT sound promising??). Anyway, when I took out the laundry, it was static free, soft and smelled so fresh that I couldn't stop sniffing it while I was folding.
The softener sheet came out and still had plenty of softener left on it so, I hung it back up for the next load. I have been using them for two weeks and each load is just as soft and fresh as the first. And, I still have 2 sheets that I made that I haven't even touched. The used up ones are back in the softener container ready to be dried again and reused.
I am super excited about this because I spent just under $10 for the softener and it looks like it is going to last, literally, YEARS. I won't have to buy softener until my boys are old enough to throw in their clothes themselves!
This was definitely an experiment worth doing. Even Husband remarks on how great the laundry feels and smells and that this money saving method isn't even hard or inconvenient to use.
Give it a try and let me know how it goes!
Saturday, January 28, 2012
Homemade Cavatelli
The Husband and I have been together for 13 years. One thing I have learned in those 13 years is that his family has many family recipes handed down that Husband LOVES. White pizza (which isn't what you'd think but, that's another post), tidells, and cavatelli are just a few that I would like to master. So, I started with the Cavatelli.
Mind you, I have asked over and over for a recipe. But, like any good family recipe, there really isn't a recipe at all. Mother in Law and the Aunts learned from their mother who likely learned from hers and so they didn't need a recipe. They just mixed the ingredients until it felt right. Meaning well, they promised to write down a recipe the next time they made cavatelli and tried to measure the ingredients as they went in. Well, since I have been waiting and waiting, I decided to consult The Google to find a recipe with which to start out my own cavatelli making.
There seemed to be a lot of similar ingredients but different ratios amongst the recipes out there. So, I sort of formulated an average and came up with this:
6 cups AP Flour
32 oz ricotta cheese
4 eggs
2tsp salt
Seemed pretty straight forward. And pretty inexpensive which makes me happy, of course! I was lucky enough that one of Husband's aunts visited a few months ago and decided to whip up a huge batch of these little cavatelli for the family and she showed me how to make them. So, I felt like I was pretty set for this adventure in pasta.
First, put the flour in a large mixing bowl. You'll need enough head room to mix the flour with the wet ingredients so that the flour doesn't spill out everywhere.

Then, make a well in the middle and add the eggs and cheese and salt.

Using a fork, mix the wet ingredients together in the well which will also start to pull in some of the flour. Incorporate the flour in this way until it just becomes impractical to continue in the bowl. Then, take some of the flour from the bowl to dust your counter and turn the bowl out.
Knead the rest of the flour into the dough. It should be soft and moist but not sticky. There will also be moments when you are *sure* the dough won't come together but, keep going. It will become dough- I promise. Put back in the bowl and cover with a moist towel for at least a half hour. This is so that all of the flour will properly hydrate and absorb the moisture from the cheese and eggs. That will make it a cohesive dough.

After that, the real work begins. Grab a handful of dough and roll it into a snake. Then, take a knife and cut that snake into small segments like the picture.


Take those segments and roll them into the cavatelli. Do that by taking one finger and pressing into the dough while moving accross it at the same time. The goal is to have it roll over onto itself to make a little curl.


Place on a towel to dry for storage (be sure the surface is dry or they will stick when you store them in a bag or container) or cook right away for 5 minutes (or until they float) in boiling salted water.

The batch I made I served with an easy roasted tomato and garlic sauce. Just roast grape tomatoes and garlic cloves until soft and caramelized (about 45 min at 400). First slather them in olive oil and some salt and pepper. Then I coated the cavatelli in olive oil and put the tomatoes and garlic over the top with the oil from the roasting pan as well. Some parmesan cheese and it was perfect!


The cavatelli was really tasty and a great vehicle for the sweetness of the roasted tomato and garlic. It was a lot of work to get all of them rolled but, we had an awesome dinner and there is a great big bag in the freezer for 2 or 3 future meals as well.
Husband is thrilled!
Give this one a try! If you don't have a lot of people to cook for or you don't want to make a large batch for freezing, you can very well halve the recipe and get the same tasty dinner for half the time I spent. It was so worth it, though.
Mind you, I have asked over and over for a recipe. But, like any good family recipe, there really isn't a recipe at all. Mother in Law and the Aunts learned from their mother who likely learned from hers and so they didn't need a recipe. They just mixed the ingredients until it felt right. Meaning well, they promised to write down a recipe the next time they made cavatelli and tried to measure the ingredients as they went in. Well, since I have been waiting and waiting, I decided to consult The Google to find a recipe with which to start out my own cavatelli making.
There seemed to be a lot of similar ingredients but different ratios amongst the recipes out there. So, I sort of formulated an average and came up with this:
6 cups AP Flour
32 oz ricotta cheese
4 eggs
2tsp salt
Seemed pretty straight forward. And pretty inexpensive which makes me happy, of course! I was lucky enough that one of Husband's aunts visited a few months ago and decided to whip up a huge batch of these little cavatelli for the family and she showed me how to make them. So, I felt like I was pretty set for this adventure in pasta.
First, put the flour in a large mixing bowl. You'll need enough head room to mix the flour with the wet ingredients so that the flour doesn't spill out everywhere.

Then, make a well in the middle and add the eggs and cheese and salt.

Using a fork, mix the wet ingredients together in the well which will also start to pull in some of the flour. Incorporate the flour in this way until it just becomes impractical to continue in the bowl. Then, take some of the flour from the bowl to dust your counter and turn the bowl out.
Knead the rest of the flour into the dough. It should be soft and moist but not sticky. There will also be moments when you are *sure* the dough won't come together but, keep going. It will become dough- I promise. Put back in the bowl and cover with a moist towel for at least a half hour. This is so that all of the flour will properly hydrate and absorb the moisture from the cheese and eggs. That will make it a cohesive dough.

After that, the real work begins. Grab a handful of dough and roll it into a snake. Then, take a knife and cut that snake into small segments like the picture.


Take those segments and roll them into the cavatelli. Do that by taking one finger and pressing into the dough while moving accross it at the same time. The goal is to have it roll over onto itself to make a little curl.


Place on a towel to dry for storage (be sure the surface is dry or they will stick when you store them in a bag or container) or cook right away for 5 minutes (or until they float) in boiling salted water.

The batch I made I served with an easy roasted tomato and garlic sauce. Just roast grape tomatoes and garlic cloves until soft and caramelized (about 45 min at 400). First slather them in olive oil and some salt and pepper. Then I coated the cavatelli in olive oil and put the tomatoes and garlic over the top with the oil from the roasting pan as well. Some parmesan cheese and it was perfect!


The cavatelli was really tasty and a great vehicle for the sweetness of the roasted tomato and garlic. It was a lot of work to get all of them rolled but, we had an awesome dinner and there is a great big bag in the freezer for 2 or 3 future meals as well.
Husband is thrilled!
Give this one a try! If you don't have a lot of people to cook for or you don't want to make a large batch for freezing, you can very well halve the recipe and get the same tasty dinner for half the time I spent. It was so worth it, though.
CVS Scenario for the week of 1/29
One of my personal goals for the year (which I haven't written about yet) is to keep track of my coupon and sales savings. One way that I am going about increasing my savings without increasing spending is working on my CVS shopping skills. CVS is an awesome place to shop since there are so many different types of items like food, drugs, household items, and beauty items- all things we need to buy anyway. CVS is great because you can get an ExtraCare card and qualify for their Extra Care Bucks (or ECBs). These bucks can be used toward your next purchase even if your next purchase is another transaction following the first where you earned your extra care bucks.
I could go into lots of details but, being relatively new to the process, my best advice is to check out Simply CVS for in depth tutorials as well as coupon matchups and ad scan previews.
Here, I will list what my plan is for this coming ad! I am kind of excited about this week since this is the most I have ever attempted to wheel and deal at CVS at once. The savings this week are pretty great, too as you will see.
Transaction #1
Buy 2 Speed stick deoderants at $1.99 each = 3.98
Use a B1G1 coupon available in this weekend's red plum - $1.99
Buy 1 Colgate Total Toothpaste at $2.74= 2.74
Use $1 off (CVS Reinventing Beauty Magazine)
Buy 1 Colgate Pro Relief at $2.74= 2.74
Use $1 off (CVS Reinventing Beauty Magazine)
Buy 1 Irish Spring Body wash at $3.00
Use $1 off in 1/29 Red Plum
Total products: $ 12.46
Total Coupons: -4.99
Extra care bucks from last week -6.85
----------------------------------------------
Total Out of pocket= 62 cents
Get back 6 ECB for next transaction
Transaction #2
3 Hallmark cards at .99= 2.97
Get 3 ECB
1 Cadbury egg at .87= .87
Get .87 ECB
3 John Frieda Shampoo/Conditioner @ $5= $15
Use 2 $1 printable coupons
Use 1 $2 coupon from mailer
Get 5 ECB
Total Products: $ 18.84
Total Coupons -$3
Extra Care Bucks from last transaction -6.00
--------------------------------------------------------
Total Out of pocket = $8.84
Get back 8.87 ECB for next transaction
Transaction #3
Buy 3 Thermacare 2ct at $5.99= 17.97
Use 1 $3 printable
Use 2 $1 off (RP 1/29)
Total products: $17.97
Total Coupons -5.00
ECB from last transaction - 8.87
----------------------------------------------
Total out of pocket= $ 4.10
Get Back 4 ECB for next week
Plus, in this week's Red Plum there is a mail in rebate form for $10 off my Thermacare Purchase! So, they are going to PAY me to buy these products that Husband uses quite often.
This week's totals:
Product value: $49.27
Out of pocket cash: $13.56
PLUS 4 ECB for next week
PLUS $10 mail in rebate
So, all of this is completely free!! :)
See why CVS is awesome?
I could go into lots of details but, being relatively new to the process, my best advice is to check out Simply CVS for in depth tutorials as well as coupon matchups and ad scan previews.
Here, I will list what my plan is for this coming ad! I am kind of excited about this week since this is the most I have ever attempted to wheel and deal at CVS at once. The savings this week are pretty great, too as you will see.
Transaction #1
Buy 2 Speed stick deoderants at $1.99 each = 3.98
Use a B1G1 coupon available in this weekend's red plum - $1.99
Buy 1 Colgate Total Toothpaste at $2.74= 2.74
Use $1 off (CVS Reinventing Beauty Magazine)
Buy 1 Colgate Pro Relief at $2.74= 2.74
Use $1 off (CVS Reinventing Beauty Magazine)
Buy 1 Irish Spring Body wash at $3.00
Use $1 off in 1/29 Red Plum
Total products: $ 12.46
Total Coupons: -4.99
Extra care bucks from last week -6.85
----------------------------------------------
Total Out of pocket= 62 cents
Get back 6 ECB for next transaction
Transaction #2
3 Hallmark cards at .99= 2.97
Get 3 ECB
1 Cadbury egg at .87= .87
Get .87 ECB
3 John Frieda Shampoo/Conditioner @ $5= $15
Use 2 $1 printable coupons
Use 1 $2 coupon from mailer
Get 5 ECB
Total Products: $ 18.84
Total Coupons -$3
Extra Care Bucks from last transaction -6.00
--------------------------------------------------------
Total Out of pocket = $8.84
Get back 8.87 ECB for next transaction
Transaction #3
Buy 3 Thermacare 2ct at $5.99= 17.97
Use 1 $3 printable
Use 2 $1 off (RP 1/29)
Total products: $17.97
Total Coupons -5.00
ECB from last transaction - 8.87
----------------------------------------------
Total out of pocket= $ 4.10
Get Back 4 ECB for next week
Plus, in this week's Red Plum there is a mail in rebate form for $10 off my Thermacare Purchase! So, they are going to PAY me to buy these products that Husband uses quite often.
This week's totals:
Product value: $49.27
Out of pocket cash: $13.56
PLUS 4 ECB for next week
PLUS $10 mail in rebate
So, all of this is completely free!! :)
See why CVS is awesome?
Friday, January 27, 2012
2012 Goals
Everyone needs a roadmap!
This year is going to be a year of big changes for our family. The boys will be transitioning to big boy beds, potty training, and starting preschool. We just got some news that Husband may be returning to full time work after nearly 3 years of reduced hours. We are extremely grateful for the extra time that he has had to spend with the boys during their first years of life. Time like that can't be bought!
All of these changes coming have left me feeling a little out of control and floundering a bit to figure how to move our family through these changes this year while moving closer to our goals. At the end of last year, I read numerous posts from Crystal at Money Saving Mom about goal setting and how she goes about it. I was so inspired by her efforts that I decided this type of goal setting is exactly what our family needs.
Husband and I went out for dinner on New Years Eve (with a generous offer of babysitting from Grandma) and I took along a note pad. We talked about our plans and goals and dreams just like we used to before the boys were born. It was a really nice way to end our year and begin this one. Working toward the same goals with your spouse is such a great way to feel connected by purpose even when duty keeps you apart.
Here is what we came up with. Like Crystal at MSM suggested, I divided our life into priority topics and each topic into different focus areas. Each focus area then got broken down into specific steps to reach that goal.
Medical:
-eye exam for Husband
-Boys' annual appointment
-Choose new PCP and make appt for me
-Get HSA reimbursment
-Test A1C each Quarter (for me to make sure my mild diabetes is still mild)
Financial:
-See financial planner
-Open Roth IRAs
-Complete Will/Trust
-Increase emergency fund by $3000
-Rework budget
-Become cash only for variables
Parenting:
-Potty training
-Plan trips/activities
-Preschool prep
-Transition out of cribs
Relationship:
-10th anniversary trip
-Monthly date night (out)
-Monthly home date
-Monthly goal review
Plus Individual and personal goals for each of us. My personal goals and homemaking goals were a separate list so, I will talk about those separately. Some of my goals turned into family goals in a way but, they are my responsibility as the CEO of our home to implement which is why they remained on my list.
Doesn't "CEO" sound so official??
I will update these goals after our goal review sessions but, I can report now that it seems we are making progress so far! I will get more specific in my goal review posts.
I hope everyone reading will consider making a goals list for at least one area of their lives. I have already felt more purposeful and intentional in my days which can be tough to do when you're a stay at home Mom.
Friday, August 12, 2011
Idea!
I love cleaning with non toxic products. Once the boys came along, I really started looking around my house to see what things they could get their mitts on and shove into their mouths and I was a little horrified about the possibilities.
I used to buy cleaning products with the same interest with which I bought new makeup or skincare products. I loved to try new things but, half way through, I got tired of it and longed for the new formula or new brand which was supposed to be better, faster, easier. There was even a brand that is supposed to have cartoon scrubbers doing all the work for me!
But I realized that all that wasn't going to work well for my family....or, well, the environment I guess. And having half full bottles of this or that under the sink just wasn't a good idea.
So, I started doing things like cleaning with white vinegar (which repels ants, too!) and doing away with those swiffer pads that you just toss. I found the idea of microfiber cloths to be interesting and they turned out to be quite effective.
So now, I have many of these cloths. I have some in the wash all the time and some ready to use and some that are sort of "half used" before I dust one more time and throw them in the wash. But, WOW- they can be very expensive. I've seen ONE cloth for $5. Sure, it was pink and pretty but, ONE?
I found myself rather disgusted while shopping in Target one day because I had another microfiber cloth on my list and I saw that $5 one in the cleaning section. I had to put it back on the shelf because, well, are you kidding me? As I was shopping, I saw a bag of microfiber cloths- 10 of them!- for $8 in the automotive section.
Wait. Less than a buck a piece? Surely these couldn't be the same thing as the cute pink $5 one. So, I stuck my finger in the bag and felt them. Sure, they felt the same. They weren't cute. 5 white and 5 blue but, who cares? I got them and they work and they are the same as the "special" designated for housecleaning types.
Just a tiny bit of dampening and they take fingerprints off anything, dust anything, remove crayon marks from the floor.....pretty much anything that needs elbow grease needs less elbow grease when done with a microfiber cloth.
So, that's my Modern Housewife tip. Check the automotive section for great cheap microfiber do-it-all cloths. And then thumb your nose toward the housecleaning aisle as you leave the store $42 richer by my calculations of the difference in cost for 10 cloths.
For the online shopper, give these a try:
I used to buy cleaning products with the same interest with which I bought new makeup or skincare products. I loved to try new things but, half way through, I got tired of it and longed for the new formula or new brand which was supposed to be better, faster, easier. There was even a brand that is supposed to have cartoon scrubbers doing all the work for me!
But I realized that all that wasn't going to work well for my family....or, well, the environment I guess. And having half full bottles of this or that under the sink just wasn't a good idea.
So, I started doing things like cleaning with white vinegar (which repels ants, too!) and doing away with those swiffer pads that you just toss. I found the idea of microfiber cloths to be interesting and they turned out to be quite effective.
So now, I have many of these cloths. I have some in the wash all the time and some ready to use and some that are sort of "half used" before I dust one more time and throw them in the wash. But, WOW- they can be very expensive. I've seen ONE cloth for $5. Sure, it was pink and pretty but, ONE?
I found myself rather disgusted while shopping in Target one day because I had another microfiber cloth on my list and I saw that $5 one in the cleaning section. I had to put it back on the shelf because, well, are you kidding me? As I was shopping, I saw a bag of microfiber cloths- 10 of them!- for $8 in the automotive section.
Wait. Less than a buck a piece? Surely these couldn't be the same thing as the cute pink $5 one. So, I stuck my finger in the bag and felt them. Sure, they felt the same. They weren't cute. 5 white and 5 blue but, who cares? I got them and they work and they are the same as the "special" designated for housecleaning types.
Just a tiny bit of dampening and they take fingerprints off anything, dust anything, remove crayon marks from the floor.....pretty much anything that needs elbow grease needs less elbow grease when done with a microfiber cloth.
So, that's my Modern Housewife tip. Check the automotive section for great cheap microfiber do-it-all cloths. And then thumb your nose toward the housecleaning aisle as you leave the store $42 richer by my calculations of the difference in cost for 10 cloths.
For the online shopper, give these a try:
Wednesday, August 10, 2011
A Housewife on Vacation
Vacationing on a budget can be a difficult thing to do. And vacationing on a budget in one of the most touristy cities in the Universe might seem....well, a bit of a mission impossible.
Orlando. Orlando is a crazy mix of overpriced theme parks and the $2 souvenir t-shirt at a ratty dump of a tourist trap gas station. So, how does a family take two toddlers for a good time for a week without having to take a second mortgage on the house (or without having to clothe ourselves in $2 shirts for the rest of the year)?
So far, we are in the planning stages. We are going this month and we are still working on a plan of how to save on activities, food, and fun. But, here is what we have come up with so far:
We broke down our trip into a few categories. These usually represent the largest expenses of vacations:
Travel
Lodging
Food
Entertainment
Travel:
Living reasonably close to Orlando, we are lucky enough to be able to drive there. Our only real issue is the price of gas. Packing lightly helps increase gas mileage so, we are taking out anything we don't need for the trip and making sure that we consider everything we pack. We plan on taking half a week's clothes and doing wash in the middle of our trip. Hopefully it will help streamline our packing efforts as well!
I have to work hard on this with the Husband because he will pack the kitchen sink if I let him. He is forever throwing in just a few more things or packing as though we won't be near a store if he finds he is in dire need of a 10th pair of white socks. He's getting better but it's hard when he is the polar opposite of my packing personality.
Lodging:
We are cheating when it comes to lodging. It isn't that I don't know how to score a great deal on an awesome hotel (we once got a beautiful 2 bedroom condo with a private indoor hot tub in Williamsburg for $99 a night!) but, my in-laws were generous enough to let us use an extra week of a timeshare they have. So, it will be a nice extra to have a separate place to put the kids to sleep since they still go down so early and there will also be a kitchen which brings me to.....
Food:
Food is one of the most expensive propositions on a trip. Snacks on the road, breakfast, lunch, dinners, special treats for the kids. It just never stops. So, I am meal planning just like I would at home. Just tonight I made a ginormous batch of chili of which half will land in the freezer. Before we leave, I'll take it out and it will defrost on the way. I will do a couple of other freezer cooking dishes. That way, we'll have home cooked and cheap meals but, I can still be on vacation! Most everything will already be cooked.
We will be grocery shopping once we arrive with the list I will premake so that we don't get off track because we are in a "vacation" mindset.
That doesn't mean there won't be some special treats. Our big splurge will be a Character Breakfast for the kids. But, with the rest of the food budget reigned in, we can make that work.
Entertainment:
Entertainment in Orlando can be a real killer. I checked recently and tickets to Disney are almost $80 each for ONE day! That's enough to wilt the mouse ears of even the most die hard Disney fans. But, with two toddlers, did we really need to go to the parks or would there be enough things that are non Disney or just Disneyesque to amuse all of us?
A little research turned up a boatload of options. One that I am particularly excited about is the Orlando Science Center. I SO wish we had one of these where we live. There are story times, stingray feedings, play areas, science exhibits that are kid friendly....all awesome looking stuff. We will definitely be there. $17 per adult and our kids will be free.
There is also a place called Monkey Joes which is a big indoor inflatables playground. They even have a spot for younger kids to play safely on their own inflatables.
There is the largest play McDonalds in the Universe. I'm not usually a fan of McDonalds but, it's worth a shot to see if the kids love to play there.
There is, of course, Downtown Disney with the lego playland and Disney appeal.
Of course, there is the character breakfast which will feature Winnie the Pooh and Tigger- really the only two Disney Characters the kids are familiar with. Also, another Disneyesque idea is paying the $14 parking fee to one of the parks and then taking the kids for a thrilling ride on the Monorail (they love trains) or the ferry.
We are lucky enough that the timeshare has lots of activities for kids that we can take part in as well as a great pool area that the kids love- all included in the timeshare week.
We are so looking forward to some great family time and an opportunity to relax without feeling like we are opening our wallets and pouring them out on the doorstep of a theme park. I will let you know how we do!
Orlando. Orlando is a crazy mix of overpriced theme parks and the $2 souvenir t-shirt at a ratty dump of a tourist trap gas station. So, how does a family take two toddlers for a good time for a week without having to take a second mortgage on the house (or without having to clothe ourselves in $2 shirts for the rest of the year)?
So far, we are in the planning stages. We are going this month and we are still working on a plan of how to save on activities, food, and fun. But, here is what we have come up with so far:
We broke down our trip into a few categories. These usually represent the largest expenses of vacations:
Travel
Lodging
Food
Entertainment
Travel:
Living reasonably close to Orlando, we are lucky enough to be able to drive there. Our only real issue is the price of gas. Packing lightly helps increase gas mileage so, we are taking out anything we don't need for the trip and making sure that we consider everything we pack. We plan on taking half a week's clothes and doing wash in the middle of our trip. Hopefully it will help streamline our packing efforts as well!
I have to work hard on this with the Husband because he will pack the kitchen sink if I let him. He is forever throwing in just a few more things or packing as though we won't be near a store if he finds he is in dire need of a 10th pair of white socks. He's getting better but it's hard when he is the polar opposite of my packing personality.
Lodging:
We are cheating when it comes to lodging. It isn't that I don't know how to score a great deal on an awesome hotel (we once got a beautiful 2 bedroom condo with a private indoor hot tub in Williamsburg for $99 a night!) but, my in-laws were generous enough to let us use an extra week of a timeshare they have. So, it will be a nice extra to have a separate place to put the kids to sleep since they still go down so early and there will also be a kitchen which brings me to.....
Food:
Food is one of the most expensive propositions on a trip. Snacks on the road, breakfast, lunch, dinners, special treats for the kids. It just never stops. So, I am meal planning just like I would at home. Just tonight I made a ginormous batch of chili of which half will land in the freezer. Before we leave, I'll take it out and it will defrost on the way. I will do a couple of other freezer cooking dishes. That way, we'll have home cooked and cheap meals but, I can still be on vacation! Most everything will already be cooked.
We will be grocery shopping once we arrive with the list I will premake so that we don't get off track because we are in a "vacation" mindset.
That doesn't mean there won't be some special treats. Our big splurge will be a Character Breakfast for the kids. But, with the rest of the food budget reigned in, we can make that work.
Entertainment:
Entertainment in Orlando can be a real killer. I checked recently and tickets to Disney are almost $80 each for ONE day! That's enough to wilt the mouse ears of even the most die hard Disney fans. But, with two toddlers, did we really need to go to the parks or would there be enough things that are non Disney or just Disneyesque to amuse all of us?
A little research turned up a boatload of options. One that I am particularly excited about is the Orlando Science Center. I SO wish we had one of these where we live. There are story times, stingray feedings, play areas, science exhibits that are kid friendly....all awesome looking stuff. We will definitely be there. $17 per adult and our kids will be free.
There is also a place called Monkey Joes which is a big indoor inflatables playground. They even have a spot for younger kids to play safely on their own inflatables.
There is the largest play McDonalds in the Universe. I'm not usually a fan of McDonalds but, it's worth a shot to see if the kids love to play there.
There is, of course, Downtown Disney with the lego playland and Disney appeal.
Of course, there is the character breakfast which will feature Winnie the Pooh and Tigger- really the only two Disney Characters the kids are familiar with. Also, another Disneyesque idea is paying the $14 parking fee to one of the parks and then taking the kids for a thrilling ride on the Monorail (they love trains) or the ferry.
We are lucky enough that the timeshare has lots of activities for kids that we can take part in as well as a great pool area that the kids love- all included in the timeshare week.
We are so looking forward to some great family time and an opportunity to relax without feeling like we are opening our wallets and pouring them out on the doorstep of a theme park. I will let you know how we do!
Monday, February 14, 2011
What does it mean to be happy?
Happiness. We all want it, strive for it, dream about it. We all wonder about it, work on it, look for it- try to recognize it when we see it. But, if we don't know where the finish line is, how will we know when we've arrived?
We feel it in snippets and wonder if there comes a point when we ARE happy instead of just temporarily FEELING happy. But is that even possible- to feel "snippet" happy all the time?
What does happy mean? Money? Success? Not wanting something more?
Is happiness getting what we've always dreamed of or is it having what we never dreamed possible?
What does happiness mean to you and how does that change how you live your life?
What does happiness mean to you and how does that change how you live your life?
Sunday, December 12, 2010
Wen Did Shampoo Get So Expensive?
I have to admit. I am having a love affair with Wen Cleansing Conditioner by Chaz Dean. My hair is generally oily at the roots and fine and frizzy at the ends and nothing really makes it happy. I can use lifting products at the roots in the hope of getting some life out of it and drying out the oiliness. I can try and use conditioner just on the ends to try and get them to behave.
None of that really works well for me. I am a hairstylist by trade- before I had the boys to stay home with- and it was a bit of an embarassment that I just couldn't find products to make my hair work for me.
Then I saw the Wen Cleansing Conditioner on TV- QVC to be precise. I was SUPER skeptical because I felt like washing oil with conditioner probably wasn't going to work. But, nothing I had already tried worked so I figured, what the heck?
I tried it. And, boy, you have to use a truckload of that stuff as directed in the instructions for my length of hair. But, it rinsed clean- much cleaner than I expected. And, when it dried, it dried like I had used a flat iron on the ends. They were shiny and smooth but my roots weren't oily! It was like someone finally made a "combination" shampoo like they make cleansers for combination skin.
Trouble is? It costs a mint. I mean, seriously, it is costing me about $35 a month just to shampoo my hair. That is completely unacceptable. Yes, I can skip serums and shaving cream and other "finishing" hair products. I don't need to buy a separate conditioner. But, still- $35 a month?
So, I Googled how to make your own homemade Cleansing Conditioner. I found this! The Saved Quarter has a series of posts about this very topic.
I am following the recipe and directions except that I am subbing White Rain Coconut conditioner for her base. I am using all of the suggested additions and I am totally excited to try it.
I have recieved all of my ingredients except the Wild Cherry Bark Extract. It will be here in the next couple of days. I spent just over $50 on all of it (including shipping!) and it looks to be enough ingredients to last a long time. I'll just have to figure out if a local store carries the White Rain since I couldn't find it and had to order it online.
As soon as I get my last ingredient, I'll be whipping up a batch and giving it a test run.
When you consider that I was about to plunk down $185 for a gallon of the Wen (because it is the most economical way to buy it) it will be a welcome miracle for this concoction to become its replacement.
I'm firing up the bunsen burners and Beaker is standing at the ready!


None of that really works well for me. I am a hairstylist by trade- before I had the boys to stay home with- and it was a bit of an embarassment that I just couldn't find products to make my hair work for me.
Then I saw the Wen Cleansing Conditioner on TV- QVC to be precise. I was SUPER skeptical because I felt like washing oil with conditioner probably wasn't going to work. But, nothing I had already tried worked so I figured, what the heck?
I tried it. And, boy, you have to use a truckload of that stuff as directed in the instructions for my length of hair. But, it rinsed clean- much cleaner than I expected. And, when it dried, it dried like I had used a flat iron on the ends. They were shiny and smooth but my roots weren't oily! It was like someone finally made a "combination" shampoo like they make cleansers for combination skin.
Trouble is? It costs a mint. I mean, seriously, it is costing me about $35 a month just to shampoo my hair. That is completely unacceptable. Yes, I can skip serums and shaving cream and other "finishing" hair products. I don't need to buy a separate conditioner. But, still- $35 a month?
So, I Googled how to make your own homemade Cleansing Conditioner. I found this! The Saved Quarter has a series of posts about this very topic.
I am following the recipe and directions except that I am subbing White Rain Coconut conditioner for her base. I am using all of the suggested additions and I am totally excited to try it.
I have recieved all of my ingredients except the Wild Cherry Bark Extract. It will be here in the next couple of days. I spent just over $50 on all of it (including shipping!) and it looks to be enough ingredients to last a long time. I'll just have to figure out if a local store carries the White Rain since I couldn't find it and had to order it online.
As soon as I get my last ingredient, I'll be whipping up a batch and giving it a test run.
When you consider that I was about to plunk down $185 for a gallon of the Wen (because it is the most economical way to buy it) it will be a welcome miracle for this concoction to become its replacement.
I'm firing up the bunsen burners and Beaker is standing at the ready!
Saturday, August 28, 2010
Virus of Doom....Or, Where in the World Have I Been?
OK. Here's the thing. Becoming a modern housewife can be a fits and starts process. I am learning as I go and I have stumbling blocks along the way.
In this case, my family has had one of the worst run of 6 weeks in our history.
First, my hernia. Carrying my two boys to full term- simultaneously- did some damage to my belly. The hernia is the only fixable part unless someone gifts me their millions for a full body lift!
I had my hernia repaired and had almost fully recovered from that (and the 10 days I wasn't able to lift my boys) when Husband and I were struck by the most horrible of illnesses to have after abdominal surgery- Rotavirus.
Thank God for Emergency Rooms that are empty and freely dispense anti-nausea drugs!
So, after the Husband's unfortunate relapse and the kids' brush with Rotavirus, we are finally back on our (somewhat thinner) feet.
Things are starting to pick up again in my homemaking efforts so, this blog will pick back up along with them!
In honor of Rotavirus, I am linking you to Preggie Pops- the antinausea candy for morning sickness, chemo, and any other nausea. It is my tribute to them for helping me survive the horribleness!
In this case, my family has had one of the worst run of 6 weeks in our history.
First, my hernia. Carrying my two boys to full term- simultaneously- did some damage to my belly. The hernia is the only fixable part unless someone gifts me their millions for a full body lift!
I had my hernia repaired and had almost fully recovered from that (and the 10 days I wasn't able to lift my boys) when Husband and I were struck by the most horrible of illnesses to have after abdominal surgery- Rotavirus.
Thank God for Emergency Rooms that are empty and freely dispense anti-nausea drugs!
So, after the Husband's unfortunate relapse and the kids' brush with Rotavirus, we are finally back on our (somewhat thinner) feet.
Things are starting to pick up again in my homemaking efforts so, this blog will pick back up along with them!
In honor of Rotavirus, I am linking you to Preggie Pops- the antinausea candy for morning sickness, chemo, and any other nausea. It is my tribute to them for helping me survive the horribleness!
Tuesday, July 27, 2010
Jam Session
After the last jam making endeavor, I thought some adjustment was in order. Some things just didn't work- the giant water canner was at the top of that list.
In order to remedy this situation, I figured that experimenting with some more jam might be a good idea. The jars are short and can easily be covered by the requisite 1-2 inches in a much shorter pot than the mammoth canner I have.
I went rummaging through all the junk I never use which is shoved in the back of some cabinet or other just waiting to fall on my unsuspecting toes if I choose to delve too deeply into the recesses of those hiding places. After the wave of curse words died down following my toe's unfortunate incident, I spied the perfect vessel.
It is a large stock pot. One I do not remember having bought or being given- it is just mysteriously there. I choose not to question my good fortune, grab the pot, and put some jam jars in there to see how they fit.
I can fit 5 jam jars into the pot at the same time with plenty of room for them to be covered. Hey, pot, if lovin' you is wrong, I don't want to be right.
I found a recipe for raspberry-pineapple jam but, seeing as I didn't have any raspberries, I made strawberry-pineapple jam. I know, all the canning recipes say not to alter them in any way lest you be cursed with botulism. But, hey, I'm more adventurous than your average fly-by-the-seat-of-your-pants jam maker.
I'm a rebel.
Here's how it went:
2 cups crushed strawberries
2 cups crushed (fresh) pineapple
1 box powdered pectin
5 cups sugar
Bring the first three ingredients to a full boil that cannot be stirred down. Boil 3 minutes.
Add sugar, return to boil and boil 3 minutes.
Process by placing in hot jars, affixing hot lids and rings, then placing in canner for a 10 minute soak in the boiling water.
The jam is sweet- the pectin I used was the regular pectin instead of the no sugar needed pectin which can jell with less sugar. I do prefer the less sweet. However, Husband loves sweet. The sweeter the better until his teeth fall out, I suppose.
Guess that's why he married me, no?

In order to remedy this situation, I figured that experimenting with some more jam might be a good idea. The jars are short and can easily be covered by the requisite 1-2 inches in a much shorter pot than the mammoth canner I have.
I went rummaging through all the junk I never use which is shoved in the back of some cabinet or other just waiting to fall on my unsuspecting toes if I choose to delve too deeply into the recesses of those hiding places. After the wave of curse words died down following my toe's unfortunate incident, I spied the perfect vessel.
It is a large stock pot. One I do not remember having bought or being given- it is just mysteriously there. I choose not to question my good fortune, grab the pot, and put some jam jars in there to see how they fit.
I can fit 5 jam jars into the pot at the same time with plenty of room for them to be covered. Hey, pot, if lovin' you is wrong, I don't want to be right.
I found a recipe for raspberry-pineapple jam but, seeing as I didn't have any raspberries, I made strawberry-pineapple jam. I know, all the canning recipes say not to alter them in any way lest you be cursed with botulism. But, hey, I'm more adventurous than your average fly-by-the-seat-of-your-pants jam maker.
I'm a rebel.
Here's how it went:
2 cups crushed strawberries
2 cups crushed (fresh) pineapple
1 box powdered pectin
5 cups sugar
Bring the first three ingredients to a full boil that cannot be stirred down. Boil 3 minutes.
Add sugar, return to boil and boil 3 minutes.
Process by placing in hot jars, affixing hot lids and rings, then placing in canner for a 10 minute soak in the boiling water.
The jam is sweet- the pectin I used was the regular pectin instead of the no sugar needed pectin which can jell with less sugar. I do prefer the less sweet. However, Husband loves sweet. The sweeter the better until his teeth fall out, I suppose.
Guess that's why he married me, no?

Saturday, July 24, 2010
Bare Cupboards, Full Bellies, Fatter Wallets
After my last post, SnowyWhite commented that she would like to know some tips about how to shop to aim for an empty fridge at the start of the next shopping week. Thanks, for asking, SnowyWhite!
This topic is something that I've really struggled with. I hated tossing things out. So much so that I would wait until I had gone shopping again and, while the ice cream was melting and the milk was sweating, I would toss the fridge so fast that I wouldn't have time to feel the guilt about all the things I was throwing out.
Just toss toss toss, place new items in fridge, admire fridge and how neat and clean and, well, edible everything looked and vow not to waste anything from this week's shopping. Needless to say, that wasn't really the best strategy. I had to think more about what I was buying and using- or in that case, not using.
First is the thing everyone tells you- menu plan. Oh how my eyes glaze over when I think about menu planning. It is a necessary evil, though. It keeps you on track at the store so you don't spend more than you need to as well as it keeps you on track during the week to know what you are meant to be making that night.
One of the things I hated about menu planning is that I would set out which days to have what dinners. When that day came and I just didn't feel like eating that thing, I would want to bail on the plan. Takeout, anyone?
Now, I just make a plan and I use it with more fluidity. I can have whatever dinner I want for that night and I don't feel like I've deviated from the list.
One thing that I've been experimenting with the last few weeks is the idea of a main dinner staple. My thoughts were that making a lot of one versatile thing that could be used in different ways for different meals would keep my budget reasonable and the dinners varied and more streamlined.
Two weeks ago, I made a tray of roasted veggies- eggplant, zucchini, bell peppers, and onions. I used them in a veggie pasta with a white sauce one night (and leftovers another night) and then as a topping for a homemade pizza another night. They also made great veggies for the boys to have for their meals, too.
Last week, my staple item was chicken cutlets on sale from the grocery store. I breaded and baked a tray of them. I had them first with potatoes and then second with sauce and cheese as chicken Parmesan. Both ways made leftovers and they were completely different dishes.
With half of dinner already precooked, it was much easier to stay on track for eating all of the food I had purchased.
So, menu planning, one staple item.....what else?
Of course, another oldie- making a list. Making a list does a few things for you. It keeps you from deviating and spending too much at the store, it makes certain that you buy everything you meant to buy to fulfill your menu plan, and it makes sure that you don't end up with a cart full of drinks one day- and hardly any food- just because you were really thirsty while shopping.
*Achem*
Anyway, yes. A list helps you make sure that you have all the ingredients and all the side dishes to make your meals. It helps make sure that you don't double buy because you make the list at home where you can check your stocks. You also have the opportunity to ask Husband if there is anything special he'd like that you would never think of- or remember.
One other thing that helps me is to plan fewer meals than you have days of the week. Planning for and buying 7 days worth of dinners sets you up to buy much more food than you need. I always plan at least one, usually two, leftover days during the week. It saves work and makes sure that you eat what you already have rather than reinventing the wheel every. single. night.
You can make it fresher by buying an extra side dish to make with the leftover entree. Sometimes that's all you need to perk up leftovers. Or, whip up a batch of bread sticks or some homemade salad dressing to liven things up a little.
Lastly, and this might be the most important, LOOK in your fridge. Trying to remember what you have in there might not be terribly effective. How many times have you peeked in there and said "oh, I forgot about so-and-so"? But, by then it's dried out, molded, or just otherwise inedible. It ends up as part of the toss fest during the next grocery haul.
Looking in the fridge and seeing the fruit you need to eat (or plan something to use it for) and how much milk you have left (if you need to dream up some recipe to use it in) or the veggies that might be ready to go off (you can toss them in your future soup bag in the freezer).
The more you keep out of the trash, the more goes in your belly and the more cash you can keep in your wallet!
This topic is something that I've really struggled with. I hated tossing things out. So much so that I would wait until I had gone shopping again and, while the ice cream was melting and the milk was sweating, I would toss the fridge so fast that I wouldn't have time to feel the guilt about all the things I was throwing out.
Just toss toss toss, place new items in fridge, admire fridge and how neat and clean and, well, edible everything looked and vow not to waste anything from this week's shopping. Needless to say, that wasn't really the best strategy. I had to think more about what I was buying and using- or in that case, not using.
First is the thing everyone tells you- menu plan. Oh how my eyes glaze over when I think about menu planning. It is a necessary evil, though. It keeps you on track at the store so you don't spend more than you need to as well as it keeps you on track during the week to know what you are meant to be making that night.
One of the things I hated about menu planning is that I would set out which days to have what dinners. When that day came and I just didn't feel like eating that thing, I would want to bail on the plan. Takeout, anyone?
Now, I just make a plan and I use it with more fluidity. I can have whatever dinner I want for that night and I don't feel like I've deviated from the list.

One thing that I've been experimenting with the last few weeks is the idea of a main dinner staple. My thoughts were that making a lot of one versatile thing that could be used in different ways for different meals would keep my budget reasonable and the dinners varied and more streamlined.
Two weeks ago, I made a tray of roasted veggies- eggplant, zucchini, bell peppers, and onions. I used them in a veggie pasta with a white sauce one night (and leftovers another night) and then as a topping for a homemade pizza another night. They also made great veggies for the boys to have for their meals, too.
Last week, my staple item was chicken cutlets on sale from the grocery store. I breaded and baked a tray of them. I had them first with potatoes and then second with sauce and cheese as chicken Parmesan. Both ways made leftovers and they were completely different dishes.
With half of dinner already precooked, it was much easier to stay on track for eating all of the food I had purchased.
So, menu planning, one staple item.....what else?
Of course, another oldie- making a list. Making a list does a few things for you. It keeps you from deviating and spending too much at the store, it makes certain that you buy everything you meant to buy to fulfill your menu plan, and it makes sure that you don't end up with a cart full of drinks one day- and hardly any food- just because you were really thirsty while shopping.
*Achem*
Anyway, yes. A list helps you make sure that you have all the ingredients and all the side dishes to make your meals. It helps make sure that you don't double buy because you make the list at home where you can check your stocks. You also have the opportunity to ask Husband if there is anything special he'd like that you would never think of- or remember.
One other thing that helps me is to plan fewer meals than you have days of the week. Planning for and buying 7 days worth of dinners sets you up to buy much more food than you need. I always plan at least one, usually two, leftover days during the week. It saves work and makes sure that you eat what you already have rather than reinventing the wheel every. single. night.
You can make it fresher by buying an extra side dish to make with the leftover entree. Sometimes that's all you need to perk up leftovers. Or, whip up a batch of bread sticks or some homemade salad dressing to liven things up a little.
Lastly, and this might be the most important, LOOK in your fridge. Trying to remember what you have in there might not be terribly effective. How many times have you peeked in there and said "oh, I forgot about so-and-so"? But, by then it's dried out, molded, or just otherwise inedible. It ends up as part of the toss fest during the next grocery haul.
Looking in the fridge and seeing the fruit you need to eat (or plan something to use it for) and how much milk you have left (if you need to dream up some recipe to use it in) or the veggies that might be ready to go off (you can toss them in your future soup bag in the freezer).
The more you keep out of the trash, the more goes in your belly and the more cash you can keep in your wallet!
Thursday, July 22, 2010
Signs of Success
There are many ways to gauge one's success in the workplace. Did you get a raise? A promotion? Did your boss or client praise the job you've done?
In the home, there are no such benchmarks of success. Especially for someone learning the ropes of engaging in the career of homemaker, the signs of success can be even less obvious. Things are not always in order or gleaming as I dreamed they would be. I'm working on it. Dinners are not always on time, I'm working on that, too. I am not always put together (or even that clean) by the end of the day when Husband arrives home.
But, the other day, I noticed a sign of my success. Right before I went grocery shopping over the weekend, I noticed the fridge was bare. I had used everything I bought the week before and the leftovers had been consumed. I didn't have to throw out moldy berries or identify various leftover-ish science experiments lingering in the recesses of the refrigerator. There weren't any dried out herbs sitting on the shelf that went into the trash or shriveled corn that went unused during the week. I had cooked or used everything I had purchased.
And that, to me, was a victory.
Now, where's my raise?
In the home, there are no such benchmarks of success. Especially for someone learning the ropes of engaging in the career of homemaker, the signs of success can be even less obvious. Things are not always in order or gleaming as I dreamed they would be. I'm working on it. Dinners are not always on time, I'm working on that, too. I am not always put together (or even that clean) by the end of the day when Husband arrives home.
But, the other day, I noticed a sign of my success. Right before I went grocery shopping over the weekend, I noticed the fridge was bare. I had used everything I bought the week before and the leftovers had been consumed. I didn't have to throw out moldy berries or identify various leftover-ish science experiments lingering in the recesses of the refrigerator. There weren't any dried out herbs sitting on the shelf that went into the trash or shriveled corn that went unused during the week. I had cooked or used everything I had purchased.
And that, to me, was a victory.
Now, where's my raise?
Tuesday, July 20, 2010
Lessons learned
Some things are harder than they look. Some things are just as hard as they look. Canning is a bit deceptive. It seems very up front- make product, put product in jars, boil jars, store product. Right? Well, here are some lessons I learned from this weekend's first adventure in canning.
Let's take this one bit at a time. The canner is big. The directions make very clear that the jars must be covered by at least 1-2 inches of water so, I filled it up accordingly. It took over an hour and 15 minutes to finally come to a boil. An hour and 15 minutes of waiting and watching and peeking under the lid and thinking about how this was a really dumb idea to begin with.
Secondly, I started the jam recipe at the same time I put the canner on to boil thinking that making jam must be complicated and time consuming. After all, they charge so much for the real fruit jams in the store. It must be difficult. So, I think that by the time this difficult product is ready for the canner, the water should be ready.
Last, the recipe has a few steps and you are given exact numbers of minutes to let the pectin boil with the fruit before the sugar is added and the exact number of minutes to let the sugar boil with the fruit/pectin mixture before the mixture has to be IMMEDIATELY deposited into hot jars and then into the canner. Or suffer the pain of death, I assumed.
Because I had started the jam so early (as I came to find out) I had to hold the fruit with the pectin boiled into it for over an hour. I turned off the burner and kept stirring until it stopped boiling and then just waited. When the canner was ready to go, I brought the fruit/pectin mixture back to a boil (and added about 1/4 cup of water to make up for the extra evaporation) and added the sugar and just continued with the recipe.
At one point, Husband was hovering over me asking if the recipe was going to fail. The directions also advise of the dire consequence of the jam not jelling if you don't adhere to the instructions word for word.
So, we just figured that it would be an exercise in practicing using the canner to see if I could even get the jars to seal. I put the hot jam into hot jars, put the hot lid on top and screwed on the ring. 6 jars into the canner for 10 minutes.
They all came out and I set them aside to be undisturbed for 8 hours like the directions say. And, a magical thing happened- I heard POP POP POP! The lids of the jars were being sucked in from the vacuum I created with my successful canning! They sealed!
I did another batch since it was obvious that the most time consuming part was heating the canner.
In the morning, I opened the jar where I had put the extra from the first batch. It was cool and ready to go in the fridge so, I tasted it to see how big a failure the batch turned into due to my flagrant misuse of the power of jam making.
It was delicious! Perfectly jelled, tart, sweet, raspberry jam! I had done it.
Of course, I have to come up with some solution to the glacial pace of the water canner boiling. It could be the canner or the burner I had to buy to use instead of my glass top stove. Husband has offered the use of the outdoor turkey fryer gas burner. I just might try that. So, stay tuned for more adventures of this Modern Housewife.
I am officially a canner!

Here is what I did (you know, the second time when I didn't screw it up):
Next week, I think I will try making strawberry pineapple jam. Maybe I should start heating the water now....
1- It will take much longer for the water in the canner to boil than you think.
2- It will take much less time to prepare the fruit and make the jam than you think.
3- The jam recipe is a lot less delicate than the directions on the box of pectin will lead you to believe.
Let's take this one bit at a time. The canner is big. The directions make very clear that the jars must be covered by at least 1-2 inches of water so, I filled it up accordingly. It took over an hour and 15 minutes to finally come to a boil. An hour and 15 minutes of waiting and watching and peeking under the lid and thinking about how this was a really dumb idea to begin with.
Secondly, I started the jam recipe at the same time I put the canner on to boil thinking that making jam must be complicated and time consuming. After all, they charge so much for the real fruit jams in the store. It must be difficult. So, I think that by the time this difficult product is ready for the canner, the water should be ready.
Last, the recipe has a few steps and you are given exact numbers of minutes to let the pectin boil with the fruit before the sugar is added and the exact number of minutes to let the sugar boil with the fruit/pectin mixture before the mixture has to be IMMEDIATELY deposited into hot jars and then into the canner. Or suffer the pain of death, I assumed.
Because I had started the jam so early (as I came to find out) I had to hold the fruit with the pectin boiled into it for over an hour. I turned off the burner and kept stirring until it stopped boiling and then just waited. When the canner was ready to go, I brought the fruit/pectin mixture back to a boil (and added about 1/4 cup of water to make up for the extra evaporation) and added the sugar and just continued with the recipe.
At one point, Husband was hovering over me asking if the recipe was going to fail. The directions also advise of the dire consequence of the jam not jelling if you don't adhere to the instructions word for word.
So, we just figured that it would be an exercise in practicing using the canner to see if I could even get the jars to seal. I put the hot jam into hot jars, put the hot lid on top and screwed on the ring. 6 jars into the canner for 10 minutes.
They all came out and I set them aside to be undisturbed for 8 hours like the directions say. And, a magical thing happened- I heard POP POP POP! The lids of the jars were being sucked in from the vacuum I created with my successful canning! They sealed!
I did another batch since it was obvious that the most time consuming part was heating the canner.
In the morning, I opened the jar where I had put the extra from the first batch. It was cool and ready to go in the fridge so, I tasted it to see how big a failure the batch turned into due to my flagrant misuse of the power of jam making.
It was delicious! Perfectly jelled, tart, sweet, raspberry jam! I had done it.
Of course, I have to come up with some solution to the glacial pace of the water canner boiling. It could be the canner or the burner I had to buy to use instead of my glass top stove. Husband has offered the use of the outdoor turkey fryer gas burner. I just might try that. So, stay tuned for more adventures of this Modern Housewife.
I am officially a canner!
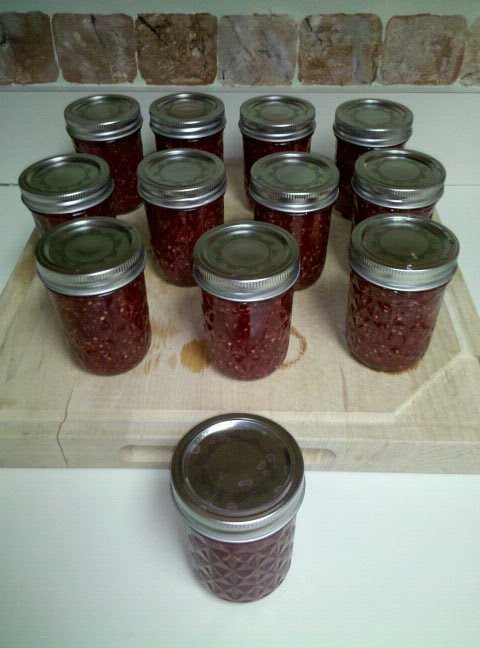
Here is what I did (you know, the second time when I didn't screw it up):
Buy 2.5lbs of raspberries and one box of no sugar needed pectin. On hand, have 3 cups of sugar.
Heat canner with enough water to cover jars by 1-2 inches.
Wash jars and 2 piece caps.
Place lids in a small pot of water which you will bring to a simmer.
Place jars into a cold oven and heat to 190 degrees and hold until ready to put jam into jars.
While the canner heats up (and give it an hour or so before you even bother to start the jam) crush your 2.5lbs of raspberries with a potato masher. Put in a 6qt saucepan and add pectin.
Bring to a boil that you cannot stir down. Boil while stirring 3 minutes.
Add 3 cups of sugar and return to a boil. Boil hard for 3 minutes.
Remove from heat and add to jars.
Put lid (straight from simmering water) on top of the jar, put the ring on and finger tighten.
Add jars to canner and process 10 minutes.
Remove from canner and place where the jars can remain undisturbed for 8 hours.
Then, as they cool, listen for the statisfying POP from each one that means your vacuum has formed!!
Next week, I think I will try making strawberry pineapple jam. Maybe I should start heating the water now....
Friday, July 16, 2010
Learning the Can Can
I am the type to jump into things with both feet. When an idea catches my fancy, I can get a bit obsessive. I consult the Google about it. I ask friends. I search blogs for information and pictures. I have to find out as much as I can about whatever thing it is RIGHT NOW. Don't get in my way! I'll lose sleep doing research and I get mighty cranky when the internet connection at home decides to become unreliable which it normally does just when I am on one of my quests.
My newest thing is canning. Well, it isn't new. I have always been a bit of a frontier woman at heart. A few years ago, after we suffered a second major hurricane in our area just two weeks after the first, I was a happy camper in the aftermath. Of course, that was because we didn't suffer any major damage but, mostly it was because things got a lot more simple and I had to be much more creative to work with what we had.
Husband and I were both off of work since the roads weren't safe and we were making food on the grill daily, washing yesterday's clothes in the sink in the morning and hanging them on the line outside just as the sun was coming up. Going out and searching for food in the few grocery stores that had generators and making do with what they had on their picked-over shelves.
Canning, for me, is one of those life skills that I think everyone should know how to do. It saves fruits in the peak of the season when they taste best and when they are the least expensive. It can also provide lots of homemade good food in case of some natural disaster like those hurricanes.
This modern housewife has to consider such things when planning for summer.
I decided to order a canning starter kit. It has the big pot and the rack and jar lifter and whatnot. I was giddy with anticipation of the equipment for my new hobby winging its way to my door.
I was so excited when it arrived. I opened it up and admired it and took out the rack and the canning utensils. And then I saw it. I saw the label that said I can't use it on a glass top stove!! The woman in me who doesn't want to wait one second longer to try something new threw a toddlereque tantrum.
Being the crazy Googler that I am, I quickly found a solution. If we buy one of those countertop burners, I can use my new canner on that instead. I found that this problem wasn't so uncommon.
This weekend, we are headed to Walmart to buy the burner and some new jars so that I can can some raspberry jam- my favorite. No doubt I won't be able to wait long to put these things to their first use so.....
....if you don't hear from me by Monday- send help!
My newest thing is canning. Well, it isn't new. I have always been a bit of a frontier woman at heart. A few years ago, after we suffered a second major hurricane in our area just two weeks after the first, I was a happy camper in the aftermath. Of course, that was because we didn't suffer any major damage but, mostly it was because things got a lot more simple and I had to be much more creative to work with what we had.
Husband and I were both off of work since the roads weren't safe and we were making food on the grill daily, washing yesterday's clothes in the sink in the morning and hanging them on the line outside just as the sun was coming up. Going out and searching for food in the few grocery stores that had generators and making do with what they had on their picked-over shelves.
Canning, for me, is one of those life skills that I think everyone should know how to do. It saves fruits in the peak of the season when they taste best and when they are the least expensive. It can also provide lots of homemade good food in case of some natural disaster like those hurricanes.
This modern housewife has to consider such things when planning for summer.
I decided to order a canning starter kit. It has the big pot and the rack and jar lifter and whatnot. I was giddy with anticipation of the equipment for my new hobby winging its way to my door.
I was so excited when it arrived. I opened it up and admired it and took out the rack and the canning utensils. And then I saw it. I saw the label that said I can't use it on a glass top stove!! The woman in me who doesn't want to wait one second longer to try something new threw a toddlereque tantrum.
Being the crazy Googler that I am, I quickly found a solution. If we buy one of those countertop burners, I can use my new canner on that instead. I found that this problem wasn't so uncommon.
This weekend, we are headed to Walmart to buy the burner and some new jars so that I can can some raspberry jam- my favorite. No doubt I won't be able to wait long to put these things to their first use so.....
....if you don't hear from me by Monday- send help!
Thursday, July 15, 2010
Back to school?
For any Modern Housewife, saving money and time are both very important! Though my two are not of the age to need this sort of thing (though I long for these days since all this new and organizational stuff makes me positively giddy!), I thought I would pass it on to readers who might need it!
Spend $100 in school supplies at Amazon.com and earn a $20 credit toward your next purchase through this link:
Enjoy all the fun stuff! I'll be around to sniff your highlighters in a jiffy.
Spend $100 in school supplies at Amazon.com and earn a $20 credit toward your next purchase through this link:
Enjoy all the fun stuff! I'll be around to sniff your highlighters in a jiffy.
Wednesday, July 14, 2010
Adventures in Pound Cake
I am always looking for easy recipes for sweets. I am the kind of person that doesn't feel like a meal is complete without something sweet to be the caboose. Of course, it goes straight to MY caboose but, I have found that with homemade sweets, I don't feel like I need as much to be happy. I think it's because all the ingredients are REAL- and I know how much work goes into it so I don't want to waste it on sheer gluttony!
One of the ways I choose what recipes I want to make are just based on what I have on hand. Lately, I have been trying to make grocery shopping a once a week affair. Research shows that we spend more money on impulse buys each time we enter the store so reducing the number of trips saves money. I tend to agree- and we can keep some of our money out of the hands of the oil and gas folks as well.
So, I have some strawberries that are on the edge. Another day, maybe two, and they would be science projects. But, right now, they are salvageable. So, I thought a strawberry shortcake would be great. I've had trial and error with angel food cake (mostly humiliating error!) so, I decided that I'd take pound cake for a test drive.
I find a lot of recipes on the Internet. Google any recipe and you're bound to find a boatload of stuff. But, I think one of the best sites is All Recipes. You get the recipe and, often, there will be hundreds of reviews of that recipe so you can know if it is perfect as-is or if it needs some changes.
The one I found needed a fair number of changes as is often the case with recipes that are deceptively easy. So, I read through the comments and took some suggestions and left others and here is the recipe I came up with:
Combining sour cream with creamed butter and sugar. I also added the Cointreau and a tsp of salt to this mixture.

Then I added the eggs and vanilla to the mixture.

Here it is after I added the flour and put it in the prepared pan.

This batter smelled exactly like a rich cheesecake when I put it in the pan. I smelled the orange from the Cointreau and the vanilla gave it such a sweet undertone to sweeten the tartness of the sour cream.
I cut the strawberries and added sugar to taste and 1tsp of the Cointreau just to keep the flavors consistent.
Here it is sliced and topped with the strawberries and whipped cream.

The cake is springy and sweetly tangy just like the aroma of the batter before it went in the oven. The juice from the strawberries soaks into the cake and makes it so fresh and juicy.
One of the ways I choose what recipes I want to make are just based on what I have on hand. Lately, I have been trying to make grocery shopping a once a week affair. Research shows that we spend more money on impulse buys each time we enter the store so reducing the number of trips saves money. I tend to agree- and we can keep some of our money out of the hands of the oil and gas folks as well.
So, I have some strawberries that are on the edge. Another day, maybe two, and they would be science projects. But, right now, they are salvageable. So, I thought a strawberry shortcake would be great. I've had trial and error with angel food cake (mostly humiliating error!) so, I decided that I'd take pound cake for a test drive.
I find a lot of recipes on the Internet. Google any recipe and you're bound to find a boatload of stuff. But, I think one of the best sites is All Recipes. You get the recipe and, often, there will be hundreds of reviews of that recipe so you can know if it is perfect as-is or if it needs some changes.
The one I found needed a fair number of changes as is often the case with recipes that are deceptively easy. So, I read through the comments and took some suggestions and left others and here is the recipe I came up with:
Pound Cake
1 1/2 cups AP flour
1 cup white sugar
1/2 cup (1 stick) of softened butter
1 cup sour cream
3 eggs
1 tsp baking soda
1 tsp vanilla
2 tbs Cointreau (Orange liquor)
1 tsp salt
Preheat oven to 325 degrees
Cream softened butter and sugar together until light and fluffy.
Add vanilla, Cointreau, and sour cream. Stir to combine.
Add eggs and incorporate.
Measure flour into the bowl and add the baking soda and salt. Use a wire whisk or electric mixer to combine into a smooth batter.
Put mixture into prepared (buttered and floured) loaf pan.
Bake for 1 hour at 325
Combining sour cream with creamed butter and sugar. I also added the Cointreau and a tsp of salt to this mixture.
Then I added the eggs and vanilla to the mixture.
Here it is after I added the flour and put it in the prepared pan.
This batter smelled exactly like a rich cheesecake when I put it in the pan. I smelled the orange from the Cointreau and the vanilla gave it such a sweet undertone to sweeten the tartness of the sour cream.
I cut the strawberries and added sugar to taste and 1tsp of the Cointreau just to keep the flavors consistent.
Here it is sliced and topped with the strawberries and whipped cream.
The cake is springy and sweetly tangy just like the aroma of the batter before it went in the oven. The juice from the strawberries soaks into the cake and makes it so fresh and juicy.
Subscribe to:
Posts (Atom)